
Hi, Stampers!
A new Make My Monday challenge is starting today and the theme is “Spring Colors.” Since the Dainty Flowers designer paper was perfect for this challenge, I decided to show you two cards I created during Sale-A-Bration, using it with Irresistible Blooms and Framed Florets. These cards were very easy to put together, which is why I love designer paper so much. Which one do you like best? Let me know in a comment!
Once you finish here, I hope you visit the Design Team gallery for some great inspiration and play along!


My secrets for Card #1!
- Firstly, this A2 card started with white cardstock, cut at 5-1/2″ x 8-1/2″, and scored at 4-1/4.”
- After that, I cut the Dainty Flowers floral patterned paper with the stitched rectangle die, then layered it onto the pretty Fresh Freesia paper, cut at 5-1/4″ x 4″.
And now, the fun part!
- Once that was done, I stamped the sentiment from Framed Florets and cut it out with the oval die from Stitched Shapes.
- After that, I stamped the flower from Framed Florets onto the Fresh Freesia paper and cropped it out with the coordinating die. Then, I stamped the leaves and cropped them out after coloring them with Blends.
- I made a loopy bow (no knot) with ribbon over the center of the floral wreath paper and popped the sentiment over the top, then added the flower and leaves.
- Finally, I placed a few Milky Dots to the flower and around the panel for a touch of bling.

Then, on the inside…
- The inside was easily done with more patterned paper and a white cardstock panel for a personal message.
- Then, I stamped the sentiment and and few flowers with more Milky Dots.
My Secrets for Card #2!
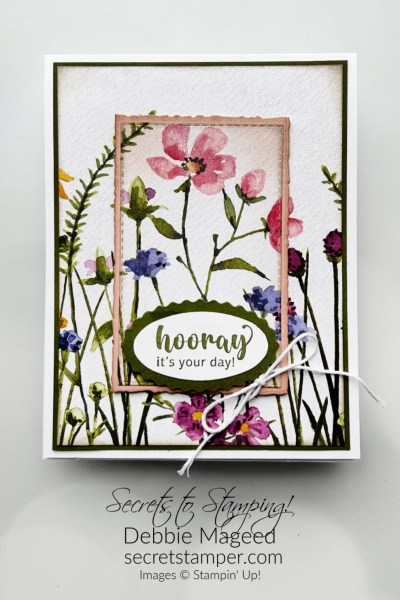

- On to my second card, which was attempting one of those Triple Time layered cards but I totally didn’t want to cover up any more of the flowers so I stopped at two.
- Firstly, after creating the A2 card base, I cut a piece of Dainty Flowers paper and cut out the middle with stitched Rectangle die. Then, I layered the large one onto Mossy Meadow cardstock and the smaller one was layered onto Blushing Bride cardstock that was cropped with a Deckled Rectangle die. Before they were glued together, both of the patterned paper pieces were sponged along the edges.
- Then, I stamped the Irresistible Blooms sentiment with Mossy Meadow ink and cropped it out with the Double Oval Punch along with Mossy Meadow cardstock for the background layer.
- Finally, I made a very simple bow with white baker’s twine and glued it down next to the sentiment.

Then, on the inside…
- Finally, I stamped the sentiment from Flowering Tulips in Mossy Meadow and cropped out with the large stitched rectangle die.
- Then, I layered it onto Blushing Bride cardstock and Mossy Meadow cardstock that was cropped with the Deckled Rectangle die.
I’m sharing my card with these challenges:
- 613 Avenue Create
- A Place To Start
- AAA Birthday
- Crafty Catz
- Cut It Up
- Pammie’s Inky Pinkies Challenges
- The Paper Funday
- A Perfect Time to Craft
- Seize the Birthday
- Try It On Tuesday (March: Green)
Before You Go!
I love hearing from you! Please leave a comment if you have any questions or comments about my project today.

If you enjoyed my project today, please be sure to…
- Firstly, visit my Gallery and Fun Fold Gallery for lots of ideas, and…
- Enter the Creative Creases Challenge HERE with any fun fold card!
- Complete this contact information to receive a birthday card from me!
- Follow me on Pinterest
- Finally, want to know what’s new with SU? Check it out HERE

") | ||||
 |  |  |  | |
 |  Organza Ribbon") Whisper White 1/4″ (6.4 Mm) Organza Ribbon [145590] $6.00 |  |  |
")
")
")
 Designer Series Paper")


 |  |  |  |  |  |

Thanks for scrolling to the end!


Both cards are wonderful but my fave is the purple one, did you have any doubt? Mr. Russ IS almost as big as Noah. Does he know he’s a celebrity on your blog? Have a blessed week. Thank you for entering our Pammie’s Inky Pinkies Challenge.
I really like what you did with Card #2 because it preserves the flow of the DSP and still has an element of the triple stamping technique. I mass produce j3j0 pluis cards mmonthly (or try!) for shut ins and am always looking for layouts that are strikiing but doable for a big project. Triple stamping would work best for special cards. Always look forward to your ideas, Debbie.
Noah is so precious. You are blessed and so is he!
Two beautiful cards and very springy. Love the designs and pretty flowers.
Beautiful Cards. Thanks for sharing. Noah is so cute!
Debbie, your two cards are so pretty. You have great talent. Thank you, Have a great day.
Two wonderful Spring cards Debbie,gorgeous pic of Noah.
Hi Debbie, I’m going to be different and say they are both my favourites for different reasons, I like the “Special Person” card, for the design, and the “Hooray” card for the flowers.
Stunning cards, great way to showcase this fabulous paper set!
These are really lovely Debbie. It’s so nice to see some beautiful spring garden photos. And your son and his teddy is an adorable photo too. Thanks for sharing with us at Try It On Tuesday. hugs-Erika
Beautifully stunning cards TFS over at AAA Birthday this month. Hope to see you again in future challenges. Elaine DT x
Beautiful card. Beautiful flowers and colors. So glad you shared over at Crafty Catz. This would fit the challenge over at Aud Sentiments.. We have new admin. and we’re monthly.. Our theme this month is Rainbow.. Hope to see you join in.
Thank you for sharing your beautiful springtime cards with us at Try it on Tuesdays.
Yvonne
I love the colors in the DS Paper as it has so many choice of colors to work with on projects as well as making lovely cards like this one.
The designer papers are gorgeous and so are your cards. Thank you for joining our Cut it Up This Makes Me Happy challenge.
Hugs,
Larelyn (CIU owner)
Both pretty cards, but I especially love the second one! The paper is so pretty and you’ve showcased it really well with the frame. Thanks for playing along with using at Seize The Birthday 🥳
I absolutely love your creations and do so appreciate the “recipe” information that you provide.
Beautiful cards!! I like the the fresh freesia paper the most😊