
Welcome to the Stampin’ Pretty Pals’ Blog Hop!
Hi, Stampers!
This month, the theme is “Love Is In The Air.” We hope that you will be inspired by the creations the Pals are sharing with you! Then, you will find the lineup at the end of my post to help you “hop” along from Pal to Pal. This theme is perfect for February, but this card can be enjoyed any time of year. I love sending this type of all-occasion card to my children and will be sending this card soon. I used the beautiful Thoughtful Expressions bundle to make this card and used the coordinating Poetic Expressions designer paper that is so lovely.


My Secrets!
Let’s start with the card base…
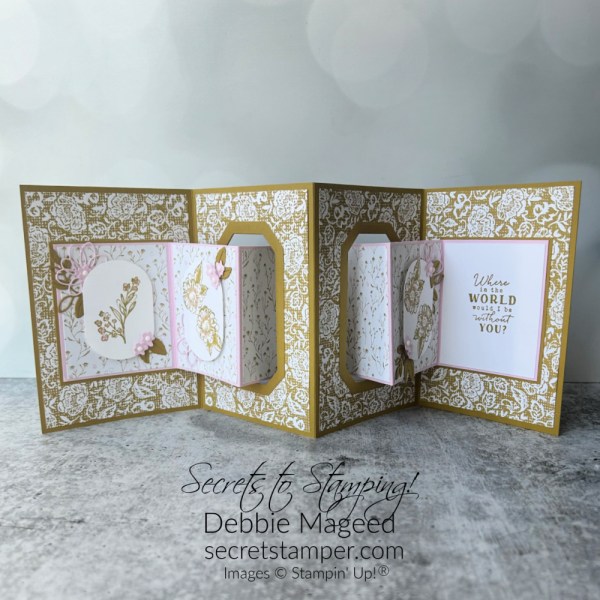
- Firstly, I made this accordion card using this tutorial by Lisa Curcio. Although I changed the size of the designer paper panels a little, the cardstock sizes all remain the same.
- Card Base: You will need two pieces to make this card base.
- Cardstock: 5-1/2″ x 12”, score at 4″ and 8″
- Cardstock: 4-1/2″ x 5-1/2″ and score at 1/2″
- Designer Paper: 3-3/4″ x 5-1/4″ (4)
- Accordion: You will need two pieces to make the accordion.
- Cardstock #1: 3-1/8″ x 8-1/2″, score at 2-3/4″ and 5-1/2″
- Cardstock #2: 3-1/8″ x 9”, score at 2-3/4″, 5-1/2″, and 8-1/2″, score at 1/2″
- Cardstock layered under the first and last panels: 3-1/4″ x 2-7/8″
- Designer Paper: 3″ x 2-5/8 (3) and 3″ x 2-7/8″ (2)
- White Cardstock for a personal message on the last panel: 3″ x 2-5/8″
And now, the fun part!
- Once that was done, I adhered the card bases together as well as the accordion pieces, making the score lines in the mountain-valley folds.
- After that, I used Countryside Corners die to cut a window into the two interior card base panels. Then, I cut more cardstock to make the frames with the next larger size and glued them around the window.
- I stamped the pretty floral images, colored them lightly with the Stampin’ Blends, and then punched them out with the Modern Oval Punch.
- After that, I cut out the outline flowers and leaves to use on each panel.
- Once that was done, I popped them up on the first, second and fifth panels.
- The first and sixth panels were layered onto cardstock once they were woven through the card base. Finally, I added some Classic Matte Dots to the flower centers.
Then, on the front…


- So, the inside of the card is the star of the show, but the front should be pretty, right? Firstly, I added the same designer paper from the inside.
- Then, I stamped the beautiful hummingbird and floral stamp and colored them with the same Stampin’ Blends.
- After that, I cut the other designer paper with the Thoughtful Expressions die and also cut a frame with two of the frames in white cardstock.
- Once that was done, I cut cardstock with a Countryside Corner die and dry embossed them with the Basics 3D embossing folder.
- I glued that panel down first, then popped the circle frame up with dimensionals to the center of the card.
- Then, I tied a loose bow with the jute trim and popped the flower image over it.
- I cut out the “love you” from the Love For You dies in both colors. After that, I glued them together so you could see the background layer, and glued them to the framed panel.
- I popped the hummingbird image, as well, and then added the dots to the flowers.
- Finally, to close the card, I cut a long piece of the jute trim around the card a couple times and tied it into a bow. SECRET: the jute trim comes off of the spool pretty curly, so I dampened it to straighten it out. Once it was dry (which didn’t take long at all), I was able to wrap it around the card.
More inspiration awaits, so use the lineup below to visit the rest of the Design Team. Then, mark your calendars for our next blog hop next month, when our theme will be “It’s All About The Kids.”
Until then, have fun in your craft space!
Stampin’ Pretty Pals Blog Hop Lineup
- Mary Fish at Stampin’ Pretty
- Beth McCullough at Stamping Mom
- Lisa Ann Bernard at Queen B Creations
- Debbie Crowley at expressively deb…
- Peggy Noe at Pretty Paper Cards
- Debbie Mageed at Secrets to Stamping <<<You are HERE>>>
- Su Mohr at Aromas And Art
- Rae Burnet at Wild West Paper Arts
- Melissa Seplowitz at The Stamping Ninja
- Tricia Chuba at ButterDish Designs
- Karen Hallam at Karen’s Stamping Habit
- Pamela Sadler at Stampin Pink Rose
- Deb Walker at Deb Stamps Life
- Sue Jackson at Just Peachy Stamping
- Mary Hanson at Up North Stampin’
- Windy Ellard at Windy’s Wonderful Creations

I’m sharing my card with these challenges:
- Allsorts
- 613 Avenue Create
- A Place To Start
- Crafty Catz
- Die Cut Divas
- Ellibelle’s Crafty Wednesday
- Pammie’s Inky Pinkies Challenges
- The Paper Funday
- A Perfect Time to Craft
- Try It On Tuesday
- We Love Stamping
I love hearing from you! Please leave a comment if you have any questions or comments about my project today.

If you enjoyed my project today, please be sure to…
- Firstly, visit my Gallery and Fun Fold Gallery for lots of ideas, and…
- Enter the Creative Creases Challenge HERE with any fun fold card!
- Then, complete this contact information to receive a birthday card from me!
- Also, follow me on Pinterest
- Finally, you find out what’s new with SU HERE

NEW! Online Exclusives Products Available NOW!


Paper Pumpkin News…

Kit details …
- Paper Pumpkin always goes all out for their anniversary month! This kit promises to be OTT gorgeous!
- Makes 9 cards: 3 each of 3 designs with 9 coordinating envelopes
- Pre-cut vellum pieces and wood embellishments
- Coordinates with the Meandering Meadows Suite Collection (item 162745)
- Coordinating colors: Granny Apple Green, Garden Green (Classic Stampin’ Spot), Balmy Blue, Night of Navy, Gorgeous Grape, Fresh Freesia
- TWO stamp sets: a FREE stamp set will be included (Please note that one of the images does not fit on the Paper Pumpkin Clear Stamp Block)
 |  | |||
 |  | |||
 | ") |  |  |  |
")
")
 Designer Series Paper")


Thanks for scrolling to the end!


Wow! Debbie, this card is stunning!! I love this amazing fun-fold design. Thanks for the instructions. Enjoy your day!
Wow…that is gorgeous….I have never seen a card made like that! Thanks for sharing!
Wow what an awesome make, love it!! Thanks for linking up to our February challenge gallery at Die Cut Divas.
Thank you for sharing this fascinating fold, Debbie! I will have to give it a try!
Debbie, this is such a beautiful and elegant card. The fun fold design and detail you put into this card is awesone!
Oh my, what an elegant card. And… that fold! Thank you for sharing your beautiful creations Debbie. Always wonderful.
Rae in Reno, DT
A lovely tapestry of a project Debbie! It is always great to see how you put your own beautiful stamp on our Pals Hop!
Wowza! What an awesome fold and beautiful card, Debbie! Way to make Wild Wheat shine too.
You always challenge me, Debbie, with your amazing cards! Now I’m going to have to try this!!!
Fabulous card, I love the fold. Thank you for joining in the Allsorts Challenge this week.
Liz xx
WOW! What a beautiful card and an amazing fun fold that I’ve never seen before! Thank you for sharing. You are very talented!
So pretty and elegant. I never would have thought of these colors together, but they are so pretty!
Debbie, I LOVE this fold! I will have to give it a try. It reminds me of a concertina. So glad Noah got to enjoy his aunt and you can tell he loves his mother!
Outstanding card!!! I was looking for a special card to do for friends’ birthdays this year and I believe this is it! Thanks so much for sharing your card & the recipe!
Wow, what a fantastic card! Just beautiful.
You are the queen of fun folds, Debbie! This one is fabulous!
Such a delightfully different shape and lovely in all the golden tones, lovely to see you at Allsorts and We Love Stamping challenges again, many thanks for joining us at both.
B x
Such a pretty card Debbie – you have combined all the elements beautifully to created a stunning, multi-fold card.
Thank you for joining us at We Love stamping this month, and using the theme
Blessings
Maxine WLS DT
A lovely design and a beautiful romantic card. Thank you flr linking with us at Try it on Tuesdays.
Yvonne
Wow what an amazing card. Thanks for sharing all the details.
Wow, that’s quite the fun fold Debbie! It looks fabulous with that lace-looking DSP!!
I love seeing card folds. Everyone has their take. I love your choice of Designer Series Paper.
Stunning as usual Deb.
Wow! What a great fold!
So beautiful. The front of the card is amazingly beautiful and the inside is just gorgeous. So glad you joined us at Die Cut Divas. Arlene
Another great card fold. Lovely card. Thank you for joining us at 613 Avenue Create this month. Hope to see you back here again soon. Judy DT https://avenue613.blogspot.com/
This is a really lovely card Debbie. I love the gold. It looks so rich. Thanks for sharing with us at TIOT. hugs-Erika
Wow! Amazing work. Your attention to detail is evident in this project. It’s like a card in a card. Thanks for sharing with A Place to Start.
Your cards are so elegant, the detail and colors are so eyecatching! Thanks for sharing your lovely card with us at The Paper Funday Challenge. We hope you’ll play again soon.
Donna xx
Paper Funday Challenge
Inspiration Station Challenge
Beautiful Blossoms Challenge
Very nice, Debbie! You have taken patterns that can get busy and gaudy and given them a most elegant presentation. Additionally, you did it while keeping to one palette! Well done, you! Thanks for sharing with us at A Place to Start!
Hugz,
Chana Malkah, Owner
An amazing card fold Debbie, not one I’ve tried before! A truly beautiful card!
Thank you so much for sharing this month at my Crafty Wednesday challenge!
Ellie
Ellibelle’s Corner
VERY nice! I always enjoy seeing your creations! Thank you.