

It’s time for a new Creative Creases challenge. Firstly, thanks to all those who participated in the last challenge! If you haven’t played in the challenge yet, I hope I can inspire you to join the challenge that’s starting today! The Top Pick for the last challenge can be found in the Creative Creases post that you can find HERE with the link to enter the current challenge.
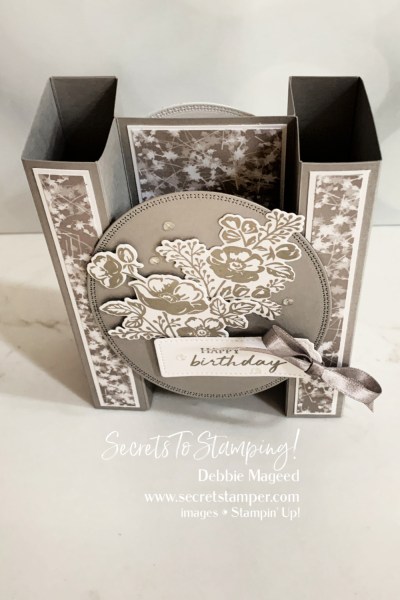
My Shaded Summer Double Bridge Tower Card
My card for you today is a double bridge card, which I then closed the ends to make two towers. I love this card and liked that I was able to use scraps taking hold of my craft table! Use any designer paper of your choice, but the OCD in me wanted to use one that didn’t have a particular pattern so I wouldn’t obsess about it.


My secrets to making this Quiet Meadow project
- Firstly, I used this Tutorial from Mixed Up Craft to make this card, although I did change up the measurements to create a 6″ x 6-1/2″ card. Full Disclosure: I should have made this card 6″ square but messed up and just went with it once I figured it out.
- Cardstock measurements:
- Card Base #1: 6″ x 6-1/2″ (2) – both pieces are scored at 1, 2, 4-1/2″ and 5-1/2″ on the 6-1/2″ side.
- Card Base #2: 4″ x 6″ and both are scored at 1″ and 3″
- Layers measurements:
- Layer #1: Cardstock (4) – 3/4″ x 5-3/4″ and DSP (4) – 5/8″ x 5-5/8″
- Layer #2: Cardstock (2) – 2-1/4″ x 5-3/4″ and DSP (2) – 2-1/8″ x 5-5/8″
- Layer #3: Cardstock (2) – 1-3/4″ x 5-3/4″ and DSP (2) – 1-5/8″ x 5-5/8″
- After that, I first glued both of the Layer #1 (bridge card base) together with glue then secured the second card base to the first card base with glue to make sure that everything fit perfectly and folded (pretty) flat.
- Then, all of the panels were glued to the completed card base.
Now, the FUN Part!
- Once I had all of the cutting done and put together, I stamped the two floral images from Shaded Summer and cropped them out with their coordinating dies.
- After that, I stamped the sentiment and cropped it out with the Tailor Made Tags die, then tied a bow with the Gray Granite Shimmer Ribbon.
- Then, I mounted them all onto the large oval die (Cottage Cutz Stitched Oval Dies CCB-010) and adhered the images with glue and dimensionals.
- CARD BACK: I cut out the flowers and leaves with Gray Granite and white cardstocks, then adhered them together with glue. After that, I cut out white cardstock with the large oval die, leaving it blank for a personal message.
- Finally, I placed the clear Elegant Faceted Gems onto both panels for the touch of bling that makes every card special!
I am submitting this card to the following challenges:
- 613 Avenue Create Challenge
- Ellibelle’s Crafty Wednesday Challenge
- NBUS Challenge – new stamp set and dies
- Pammie’s Inky Fingers Challenge
- Seize the Birthday Challenge
BEFORE YOU GO!
Click to Comment


 Metallic Edge Cotton Ribbon")
 Striped Ribbon")

 Vellum")
 Designer Series Paper")
 Layering Designs")


 Open Weave Ribbon")
 Open Weave Ribbon")
I hope you enjoyed my card today! If you did, please:
- Don’t forget to visit my Gallery for lots of ideas, and…
- And provide your contact information to receive a birthday card from me!
- NEW! Buy any of my cards just by sending me an email at debbie@secretstamper.com!
- Follow me on Pinterest and Facebook.
- Finally, want to know what’s new with SU? Check it out HERE
Ready to place an order? Don’t forget:
Product List for Today’s Project
 Designer Series Paper")


 Shimmer Ribbon")
Thanks for scrolling to the end!


Oh, my, gosh, Debbie! I have not seen this fold before and I love it…especially with the DSP and GG ribbon. I have everything I need to CASE it. OCD…I totally get!! Noah is such a sweetie and I’m glad he likes to have his picture taken. Have a blessed day.
This card is so beautiful…thank you for sharing and for your creativity.
Debbie…. what a beautiful fold. So versatile. I love the monochromatic colors you created with.
Another fantastic card Debbie and fabulous fold. Love the monochromatic colors!
And how sweet is little Noah! Love that he’s all dressed in colors of fall matching the leaves he found! So cute!
Thank you so much for sharing at my Crafty Wednesday challenge!
Ellie
Ellibelle’s Corner
Stunning tower card, Debbie. You were so creative in construction this. It is truly elegant in the neutral grays. Thanks for sharing at 613 Avenue Create’s September, “Anything Goes with a Twist/Foliage” Challenge.
Love this card! It seems your cards are all for the larger size and not for the 8 1/2 x 5 1/2 size. It there an easy way to recreate this card to the “reguar” card size? It intimidates me to think about trying to figure it out! 🙂
Oh wow! What an elegant card! I’ve never made one this elaborate before. Thanks for joining us this week at Pammie’s Inky Pinkies. Hope to see you again. Bonnie DT
Beautifully designed, Debbie! Thank you for sharing with us at The PIP Challenge.
What a fabulous fancy fold card! Someone will love receiving this. Thanks for joining in at STB
So pretty, Debbie. Love your muted colors. Thanks for joining us at 613 Avenue Create. I hope we see you on the front porch again soon!
Hugs, Em
613 Avenue Create DT
Creative Em my blog
This is a beautiful card Debbie- and such a unique fold. I will have to try this one.
This is a stunning card!
This is absolutely beautiful crafting. FANTASTIC talent!
GREAT CARDS THANKS
Beautiful card. I must try this. Thank you for showing this, and including directions.
Love this. Thank you!